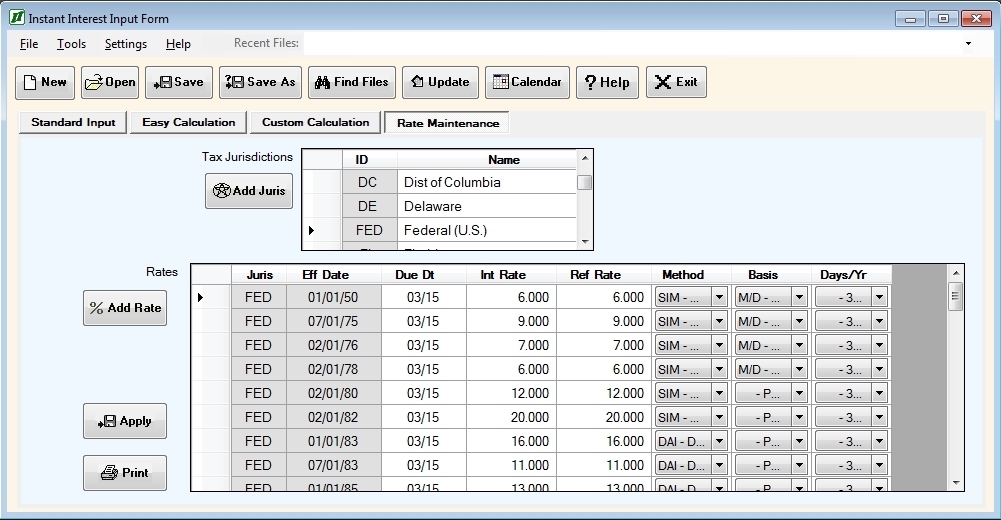
The Rate Maintenance tab is used to maintain the rate file which Instant Interest uses. It allows you to add, change or delete tax jurisdictions and rate changes for those jurisdictions. The Rate Maintenance tab is selected by clicking on the fourth tab and appears as follows:

The Rate Maintenance tab contains two tables, as follows:
The Tax Jurisdiction table is used to add or delete tax jurisdictions for which Instant Interest stores rate information. It can also be used to change the name of a tax jurisdiction.
The Interest Rate table on the Rate Maintenance tab is used to add, change, or delete rate changes for a tax jurisdiction in the Instant Interest Tax Jurisdiction table.
The Tax Jurisdiction table consists of two columns:
| • | The Jurisdiction ID; and |
| • | The Jurisdiction Name. |
To delete a jurisdiction, click on the grey area to the left of the jurisdiction to select the line and press the Delete key. Instant Interest will ask you to confirm that you really want to delete the jurisdiction.
To change the name of a jurisdiction, click on the Name field in the Tax Jurisdiction table and enter your change. Note: You cannot change the Jurisdiction ID directly as it is the key to the Jurisdiction Table in the Instant Interest rate file.
To add a jurisdiction, click on the Add Jurisdiction button next to the Tax Jurisdiction table. An Add Jurisdiction form will pop up to allow you to enter the necessary data.
The Interest Rate table consists of the following columns:
| • | Effective Date is the date on which the changes to the interest rates, calculation method, etc. went (or will go) into effect; |
| • | Due Date is the date on which returns for the jurisdiction which are based on a fiscal year that coincides with the calendar year; |
| • | Interest Rate is the percentage rate at which to calculate interest for underpayments; |
| • | Refund Rate is the percentage rate at which to calculate interest for refunds; |
| • | Method is the compounding method to be used for calculating interest (such as simple interest or daily compounding); |
| • | Basis is the means of calculating the period of time for which interest is due if it is other than calendar days; |
| • | Days/Yr is the number of days treated as a calendar year if it is not the same as the number of days actually in the calendar year. |
To delete a rate change entry, click on the grey area to the left of the effective date to select the line and press the Delete key. Instant Interest will ask you to confirm that you really want to delete the entry.
To change data about a rate change, click on any field other than the Jurisdiction ID or Effective Date and enter your change. You can move from one cell to another in the table using the cursor keys. Note: You cannot change the Jurisdiction ID or Effective Date directly as together they comprise the key to the Interest Rate Table in the rate file. You must delete an entry and add a new one.
To add an interest rate, click on the Add Rate button to the left of the Interest Rate table. An Add Rate form will pop up to allow you to enter the necessary data.
The following are valid values for entries for the Method:
SIM |
Simple interest |
DAI |
Daily compounding |
MON |
Monthly compounding |
QTR |
Quarterly compounding |
ANN |
Annual compounding |
For Basis, enter "M/D" if partial months are calculated as the number of whole months plus the number of days in a partial month. Otherwise, leave the entry blank. For example, in a non-leap year, 01/01 through 03/15 would be treated as 2 months and 15 days if the Basis is "M/D" and as 74 days if Basis is left blank.
For Days/Yr, enter "360" if taxes for partial periods are calculated based on having 360 days in the year rather than the number of days (365 or 366) actually in the year.
The command buttons that appear above the Rate Maintenance tab ("New", "Open", etc.) are common to all four of the basic input forms and are described under Common Input Form Buttons.
The Rate Maintenance tab also has two command buttons at the bottom of the screen, as follows:
The Apply button applies the changes made to the Interest Rate Table displayed on the screen to the Instant Interest rate file. Important note: Rate changes are not actually applied to the Instant Interest rate table until you click on the Apply button. If you attempt to leave this view before saving adds, changes, or deletes which you have made to Interest rates, you will be asked whether you want to do so before proceeding.
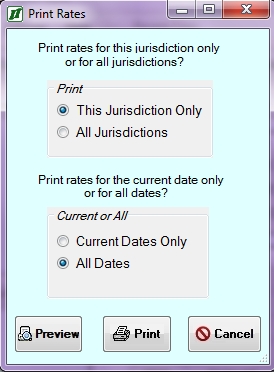
The Print button pops up a dialog that allows you to print the Instant Interest rate information for either the currently displayed tax jurisdiction only or for all jurisdictions. It appears as follows:

Select the Preview option if you want to display what output will be generated or select the print option to proceed to the standard Windows print dialog, or select